As @esloof posted on Twitter, VMware Certified Professional 5 exam (VCP510) is now available in Pearson VUE test centers around the world, you may schedule your exam here http://www.vue.com/vmware/.
Current VCP4 holders can take VCP5 exam without sitting any mandatory training until 29th of February 2012, after that date vSphere 5 What’s New training is required to take VCP5 exam.
VCP3 holders can upgrade to VCP5 by sitting vSphere 5 What’s New training and scheduling and passing their exam by 29th of February 2012, after that date vSphere 5 Install, Configure, Manage training is required.
Possible VCP5 tracks are shown in the diagram below.
In part 1 have have read how I upgraded my vCenter 4.1 server to vCenter 5.0. In this part I’m going to upgrade update manager on the same server. Later on I’m going to use update manger to upgrade my 2 vSphere ESXi 4.1 server to vSphere ESXi 5.
Again, the first step is to make a backup of you exciting server in case anything goes wrong. My vCenter server is a virtual machine, so I simply take a snapshot of it.
Now let us upgrade:
- Go to the vCenter5 DVD and start autorun.exe. Autorun starts a menu where you can choose the different installation option. Under VMware Product Installers select Update Manger and click on install.

- Select you language and the installer will start. You will get a messages that there is a earlier installation of Update Manager detected. Click Ok to start the upgrade to 5.0.

- Next through the welcome, End-User Patent Agreement and the license agreement. With the new version of Update Manager its no longer possible to patch the guest OS in your VM. With Update Manager 5 it’s only possible to upgrade a ESX/ESXi 4.x host to ESXi 5.0 only. So if you have old upgrade file on the host you can place a mark (default selected) in front of Delete the old host upgrade file from the repository. As we no longer can use them, we keep this option enabled. The second option is to start downloading patches immediately after the installation. I want to configure update manager first before downloading, so I disable the option: Download update from default sources immediately after installation.

- Next you will have to provide the password of the user who has administrator rights to your vCenter server. If you want you can alter the IP adress and HTTP port, but you probably won’t do this because the setting a correct.

- If needed alter the database information. In my case I used integrated Windows authentication so I didn’t have to change anything.

- Now we have to select if we want to upgraded the existing update manger database. Put a mark in front of YEs, I want to upgrade my Update Manager database an I have taken a backup of the existing Update Manager Database.

- Next are the TCP ports and who are used by update manager. If you want you can change these port, but the default are OK for me.

- Now we come to the final step of the upgrade. Click Install and you’re ready to go.

- During the installation you’re prompted that some files cannot be updated because there in use. After the installation you will have to reboot the server.

- During the installation I got a error: Error 25113: Setup Failed to generate JRE SSL Key
After some investigation I found a KB article who say’s that a wrong version of openssl existinst on the server who temporarily has be renamed. I forgot to take a screen shot of it (the one you see, I found on the internet) and wanted to reproduce the error. But when I did the installation again, I didn’t get the error and the installation went fine. I did had to change the SSL port and web port because those were in use. So I think that did the trick.

Final step in the upgrade is to install the plugin in your vSphere client. Without this plugin your not able to use Update Manager.
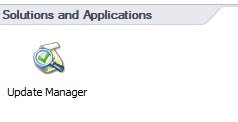
In your vSphere client go to Plug-ins and Manage Plugins. Under Available Plug-ins click on Download and Install behind VMware vSphere Update Manager. Enter through the installation keeping the defaults (this is no rocket science;-)). - After the installation of the plug-in you’ve got a extra icon in the Home view under Solutions and Applications.

Click on the Update Manger Icon and w new View will open. There we can configure the update manager, create baselines, upload patches etc. The options we’re going to use when we upgrade the ESXi hosts. But this is for part 3.
Today I had the first day of the vSphere5 what’s new training bij Eric Sloof. I went especially to his training because I know that he always gives a outstanding course. The first part of the day was about upgrading your vSphere4 and vCenter4 host to version 5. And because today VMware released vSphere 5 I thought lets upgrade my home lab tonight.
First a little bit about my home lab. My home lab consist of 2 HP Pavilion workstations with a Intel Q9300 Quad core processor and 8 GB of RAM. Both servers have 2 Intel NICs. One for Virtual Machines and VMkernel management and the other one is for shared storage witch is a Qnap TS-439 II pro configured as a NFS storage. Al my virtual machines (including vCenter) reside on that shared storage. On this same storage a have another NFS share for ISO file. This NFS share called esx-iso has the vCenter5 ISO.
Upgrading my home vSphere 4 cluster to a vSphere 5 cluster consist of 4 steps:
- Upgrading vCenter
- Upgrading Update Manager
- Upgrading vSphere
- Upgrading VMFS3 to VMFS5
- Upgrading Virtual Machines
For every step I will create a separate blog post.
Of course before we upgrade to vSphere 5 we want to check on the VMware website if our hard- and software is supported. If we have done that it’s time to start!
Part 1: Upgrading vCenter
- Before I start with upgrading my vCenter server is to take a snapshot of it. It’s a virtual machine so why not! If your vCenter server is a physical machine you want to backup you vCenter database and SSL certificates.

- Attach the ISO file to the CD-ROM player of the virtual machine. If you are using the ZIP file provided by VMware you have to make sure this ZIP file is unpack on your vCenter server.

- On the vCenter DVD there is a autorun.exe file. If it want start automatically start it by double clicking on it.

- The VMware vCenter Installer will start. This is a menu where you can start the different type of installations. I this case we want to start the upgrade of vCenter, so we click under VMware Product Installers on vCenter Server and than on the bottom right on Install.

- Select your installation languages, in my case English.

- The installer will start and will present the Welcome screen. On this screen it will say that the installer has found a earlier version of vCenter server and that this version will be upgraded to vCenter server 5.0. Because this is what we want, we click on Next.

- Next screen is al about End User Patent Agreement. Read it 😉 and click on Next.

- Than the License Agreement. Again read it, select that you agree to the license agreement (If you do) and click on Next.

- Give your User Name and Organization. If you have a valid license key for vCenter you can provide it now or later in vCenter.

- In my case I’m using the embedded MS SQL server who is configured with Windows authentication. If you have configured otherwise you will have to provide the Database Username and Database Password.

- Because Update Manager is installed on the same server, I’m getting a warning that this extension is not compatible. We will have to upgrade this after the upgrade of vCenter.

- Next I’m able to chose if I want to upgrade the exciting database or not. We select to upgrade the existing database and put a mark that we have taken the a backup of the vCenter database and SSL certificates.

- Whit vCenter version 5 all the ESX(i) host need to have a new vCenter agent installed on them. This can be done Automatic or Manual. Because my cluster consist only of 2 server I will to it automatic, but I can imaging that if you have a large environment and want to have more control you want to do it manually.

- If you vCenter Service doesn’t run under the privileges of the SYSTEM account you will have to provided the password of the user where the vCenter service runs under.

- Next you can alter the Destination folders for vCenter Server and Inventory Service if you want.

- You are provided a screen with the TCP port used by vCenter. If you want, you can alter them to a different port. Most of the time you will go with the default ports.

- Same goes for the Inventory Service Ports

- For inventory you can alter the maximum memory used. You can choose between small, medium and large deployment. Select the right one for your installation. In my case Small.

- I you need it (only when you want to power up more than 2000 VMs simultaneously) you can increase the number of ephemeral ports.

- And then finally we can click on Install and the installation will start.

- After about 15 minutes the installation is finished and we can try to login with our vSphere client. Of course we will get a pop-up saying we have to upgrade our vSphere client. Click on Run the installer and let it do it’s work.

- Now we can connect to our new vCenter 5 server.
 Just a quick post before I go on a holiday. Today I did my VCAP410-DCD exam. After the VCAP410-DCA exam this was the most difficult exam I ever took. As with the VCAP410-DCA exam I needed the full 240 minutes for the exam. Gladly after finishing the 113 questions I had 15 minutes spare to review some questions I wasn’t sure about. This I learned with the DCA exam. If I initial spend more than 2 minutes on a question (multiple or single choice), I give the answer that come first into my mind and flag the question to be reviewed later on. This worked for me this time.
I cannot review all the detail of the exam, if I do so VMware is going to hunt me down 🙂 but as I mentioned before the exam consists of 113 questions. Some of them you have to give the correct answer, other a multiple choice. Then there are the ones who take most of your time. The question where you have to make a diagram for example a network design and the question where you have to drag en drop the items on the correct answers.
So witch study material did I use? I almost read all the PDF material in the DCD blueprint guide. The only one I skipped where the one who I think I have enough experience with (installation, kickstart etc).
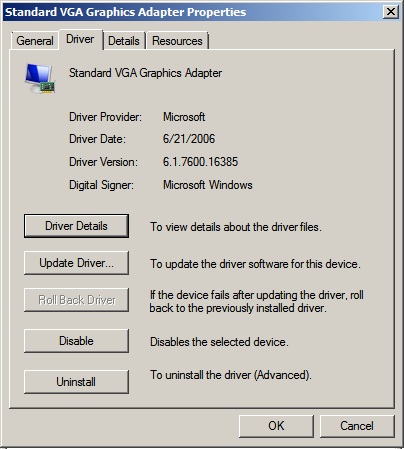
In the early day’s (Windows 2003 and older) after the VMware tools where installed your video and mouse performance where dramatic improved. As of Windows 2008 and Windows 7 after the installation of the VMware tools, mouse performance is better. But video performance is still poor. If we look at the video adapter after the installation of the VMware tools, this is still a Standard SVGA video adapter.
I
f we look the driver version, you will see this is a old driver of 2006.
What happened with the VMware SVGA Type II adapter? The driver for this video adapter is not installed by default anymore when you install the VMware tools. This is documented in the KB article.
So, how can we install the video driver for Windows 2008 and Windows7?
- Go to you device manager
- Right click on your video card and select update driver
- Browse to the folder: C:/Program Files/Common Files/VMware/Drivers/wddm_video
- Reboot your Virtual Machine
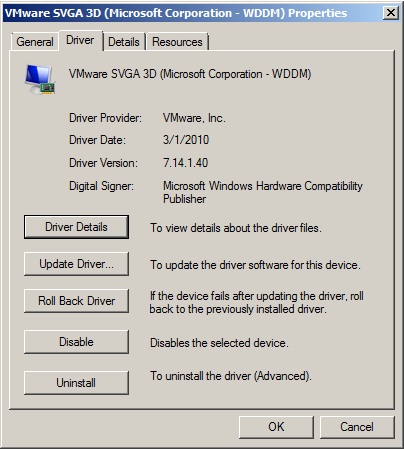
After the reboot you will see a VMware SVGA 3d(Microsoft Corporation – WDDM) video card and you will notice that your video performance is improved.
And the driver properties.
That’s all!


